What the hock?!

This oughta be good.

You’ve freezer-shelved the chops, bacon and sausage, you’ve come to terms emotionally with the lard, and just when you think you’re done unloading freezer bags from your friendly Hambulance driver, BLAM. Here comes the fresh hock to throw your animal protein-eating self into a tailspin.

By the time this delightful pig calf/forearm makes its way to your freezer, it’s been put to good use by the hog as he runs up and down the hills of Tuscarawas County. Thus, this frequently flexed knuckle is chock full of flavor. Please don’t overlook it as a dinner side piece.

We leave ours fresh (uncured and unsmoked) for our shareholders so it can serve as a blank canvass for some badass kitchen prowess. Not feeling it? Need some help? I’m here for you. Can you feel my supportive hand on your shoulder? And now, can you feel it slowly move down toward your bicep? Have you been working out? 

Sorry.

Not quite ankle, not quite butt: The hocks

Not quite trotter, not quite butt: The hocks If I’d ask a room full of grandmas what to do with a hock, they’d all raise their hands and say, “pot of beans!” And the grandmas are right. That’s one of the best ways to prepare the hock. There are plenty of resources for brining and smoking your fresh pork hock. A few are so good you might want to skip the pot of beans all together. You can also slow cook the hock for a stew that cooks itself while you are at work. But I want to take you straight to Advanced Hock Preparation. I’ve been watching you for a while now, and I think you’re ready.

Ballotine of pork

[h5]Or STUFFED PORK KNUCKLE, if you’re Ohio Proud.[/h5]

The start.

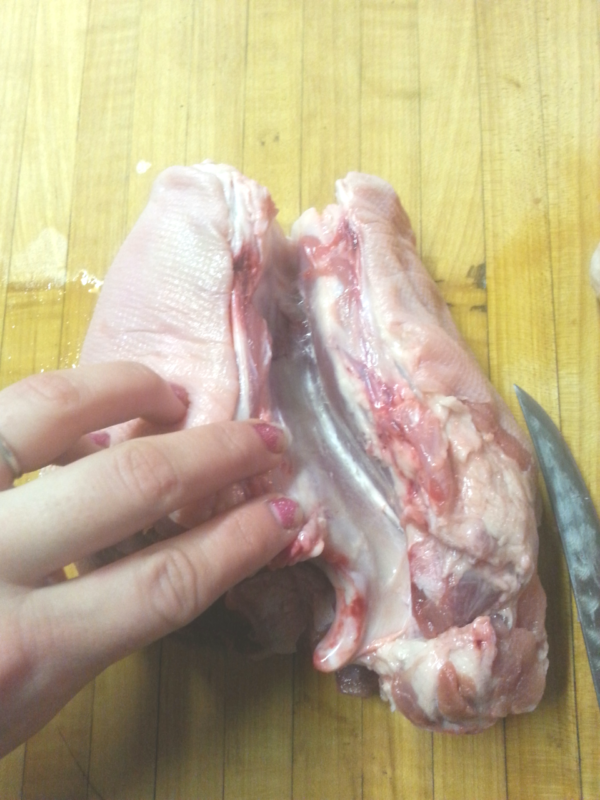
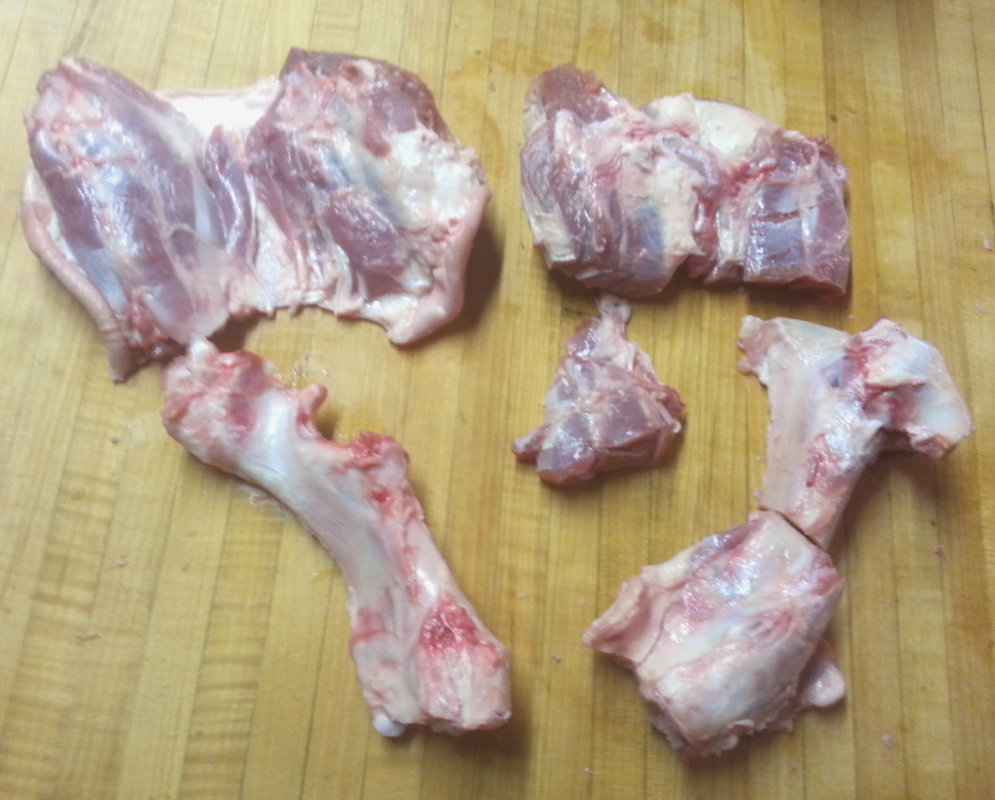
Here you see two versions of the same hock -- The one on the left was lovingly harvested at the joint by Seth and myself with skin left on, and the other bandsawed into submission by the fine craftsman at DeeJays Custom Processing. The guy on the right will probably look more like what you have in your freezer from me. If you want the lovely skin to remain on all your cuts, for now, you halfta chop the pig yourself.  Keep an eye on Facebook. In the next few days we'll announce dates for one of our summer whole hog butcher classes here at the farm and at The Commissary in Columbus. (The skin -- that’s how they getcha.)

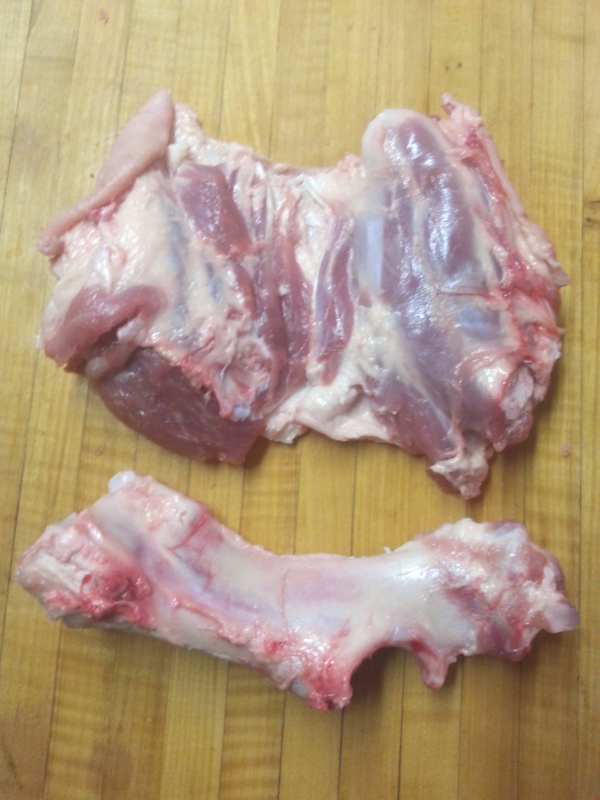
In order to stuff the hock, we have to get that bone out of there and make some room. Hock deboning is a fun little practice round for the butcher-curious. There is no real penalty for screwing this up. You can still brine, smoke or roast any maimed chunks of meat to add flavor to any soup or stock. Ignore the voice in your head that tells you you’re not qualified.

Now, when I was completing my master butchery apprenticeship in the southern hills of France, they taught me to cut down the right side of the bone like … ahh ... just yanking chains. My only training has been at home in Nowhere, Ohio working through piles of dead bodies with kids screaming that they’re hungry for dinner and YouTube running in the background. Trial by fire. Take that for what it’s worth. I make an incision down the center until I hit bone, then cut along the length if the bone, using the tip of my knife to freeing the muscle from the bone all the way around.

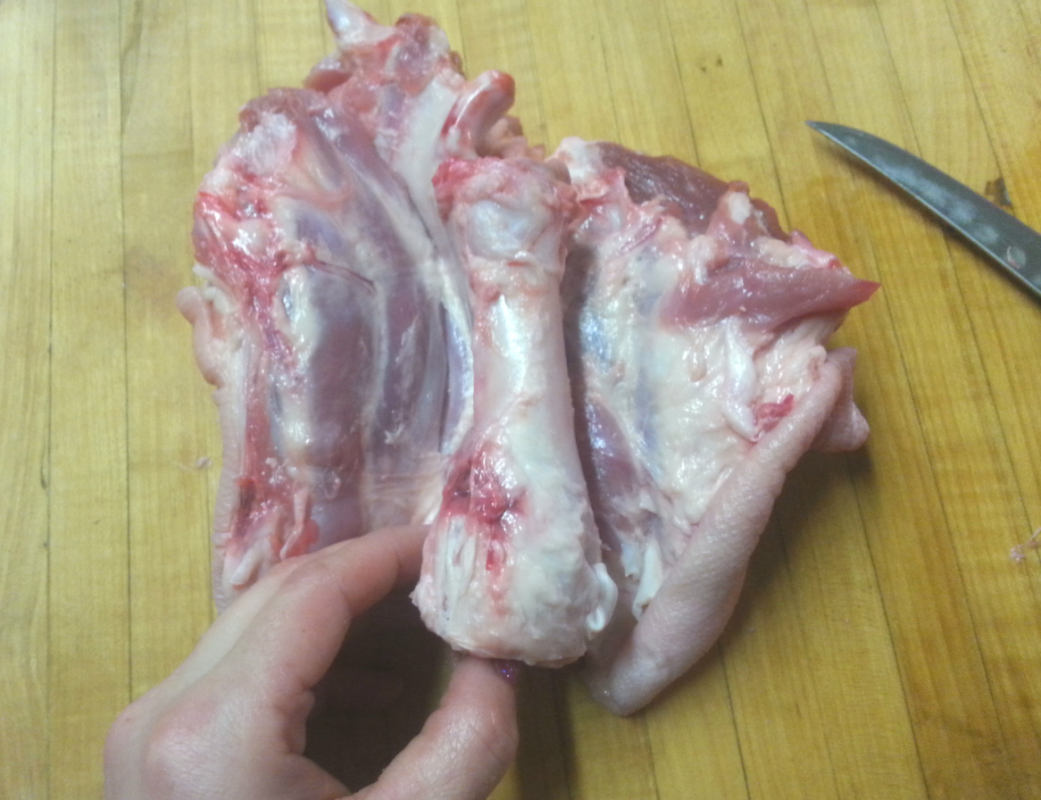
The muscle will want to separate and be free. You won’t find much resistance. No super strength required. The connective tissue will guide you. Flip it over and release the other side. Be careful along that back edge to not pierce the skin or tear your muscle group in half. If you do, you can still work with what you have left. 

Special note:

When Seth and I are separating hocks from trotters in our home kitchen, as DIY butchers, we make an incision at the joint, explore with the knife and release the hocks at the ball and socket. But you see, in America, butchers have band saws and can make elbows happen wherever they damn well please. Following the natural dotted lines of the pig is not required with powerful mechanization. Don’t be surprised if your hock contains (like this one did) an extra tibia, fibula, radius, ulna bone or two. Just cut out the bone you find. You don’t have to know the name of it.

 [h5]Now the fun part.[/h5]

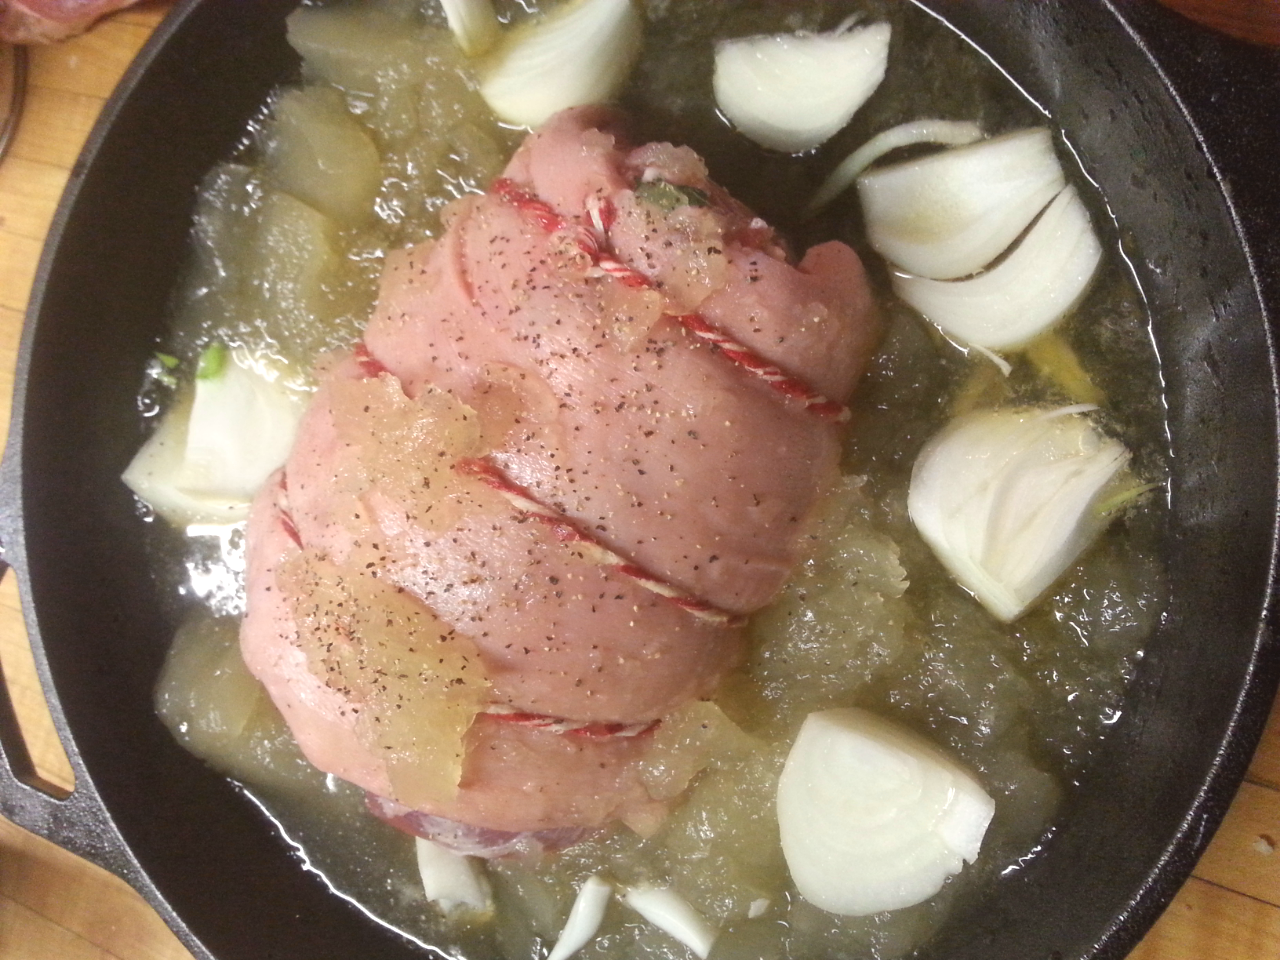
With the bone removed, you can put whatever you want in there. For this meal, it looks like I went with about a half a pound of fresh sausage, not even a quarter cup of breadcrumbs, splash of lemon juice, maybe some type of chile powder and some fresh snipped parsley? I really should've written this down. Need more ideas? Google “Ballotine of pork.” Ballotine is a French term for  taking bones out and putting your sausage inside of things. You’re welcome.

2016-04-28_08.04.55[1]

In addition to whatever sausage is thawed in the fridge, you can incorporate chunks of brined meat, cubed bacon or pancetta, pistachios, apples, dried cherries, prunes soaked with sherry .. the world is yours to stuff all up in there.

Roll, tie and place in cast iron with as much juicy braising liquid as you can fit in there: Stock, beer, wine are some suggestions. I used a roasted pork stock here. One of these days I’m going to throw this roll in the deep fryer and see what happens.

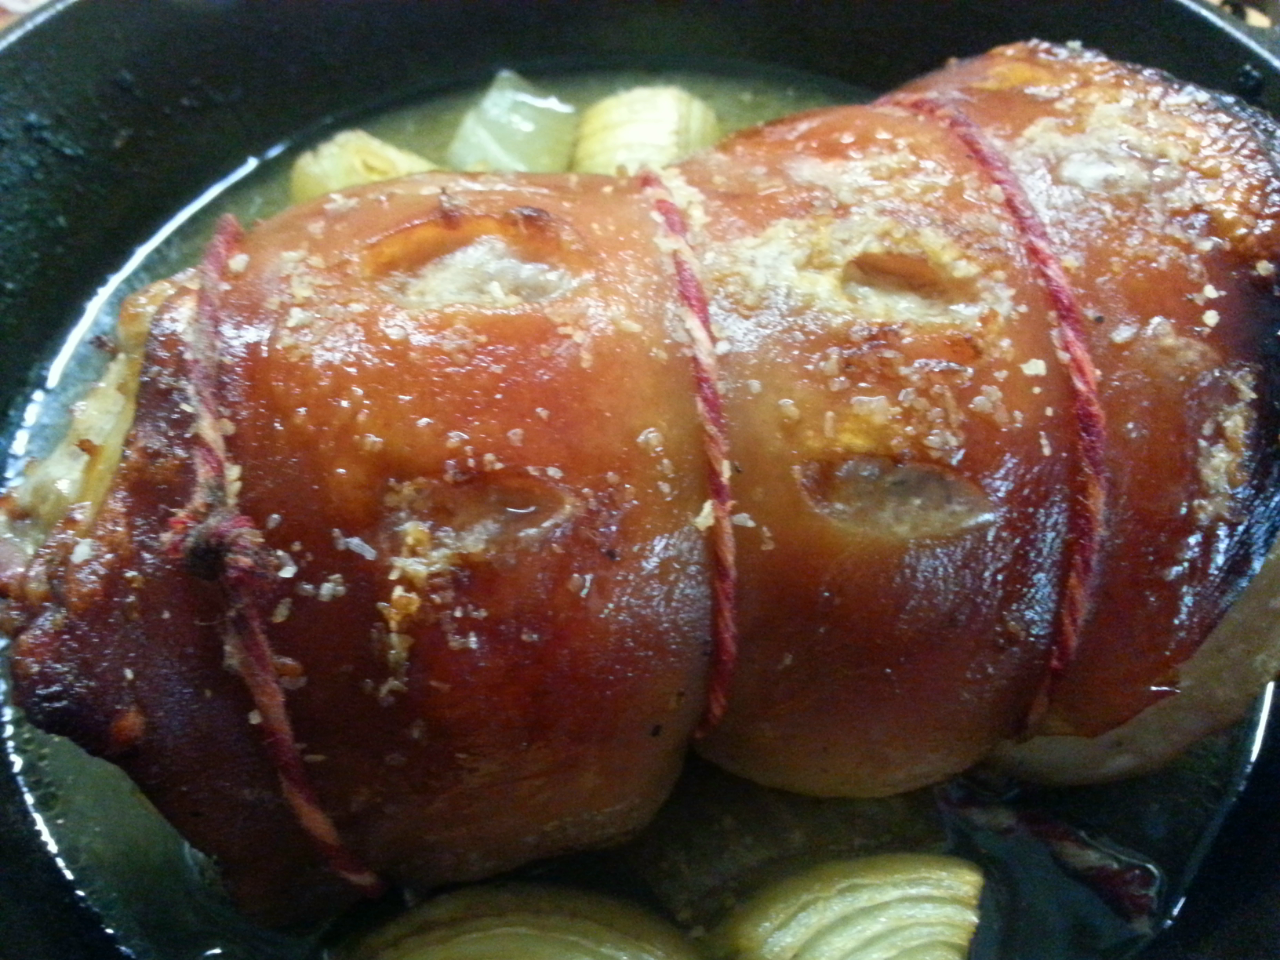
Now, you want to cook this low and slow to break down all the muscles, skin, tendons, ligaments and connective tissues that make up your hock, but you also want the skin crispy, which requires a hot cook. This is the constant challenge of mankind. (Don’t have skin? Try wrapping some bacon around it.)

What I’ve found works best is to score and salt the skin, and blast the pork roll in a hot, 500-degree oven until it looks right. You want it bubbly and crispy. 30-40 minutes usually does the trick. Keep a close eye on it. After blasting, turn the heat down to 300 and simmer your hock for about 3-4 hours. Yes. 3-4 hours.

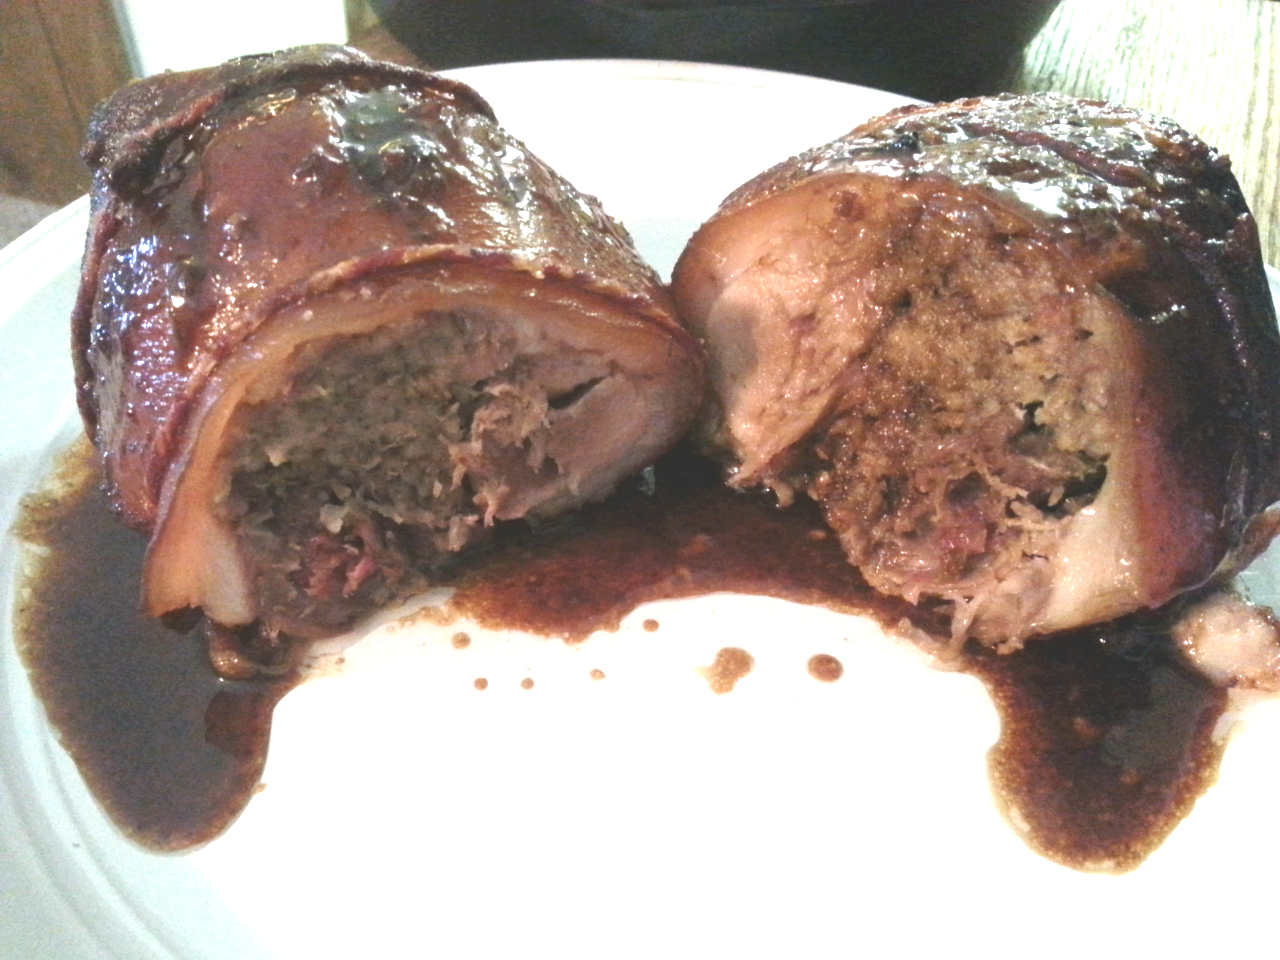
The hock is done and maybe you think, “OK, I can finally eat. There is nothing more I could possibly do to adulterate this poor hock.” Oh, but you’re wrong. You can actually let this gelatinous roll cool in the fridge over night. The next day you can slice, bread and fry it. I’m not kidding. It’s ridiculously rich. You can eat it cold and call it a knuckle sandwich. You can’t make this stuff up.

Now, isn’t that more fun than a pot of beans?

Enjoy experimenting! Let me know how it turns out!


Next up: Chiccarrones, aka pork rinds.

How Not To Bust My Chops

Your pork chop, at left, in its most primal form.

[dropcap_1]I[/dropcap_1] think I’m in juuuuuust enough of a feisty mood to write this necessary doctrine on The Chop. It’s raining. It’s muddy. The pigs have learned they can nose enough mud on the netting to ground it out.

Please don’t add to the list by BUSTING MY CHOPS.

I’ll give everyone credit, it’s pretty easy to ruin a chop. The chop comes from the loin, which runs high along the back of the hog. It is one of the least-used muscles on the whole dern piggy. That makes it  boring and overratedtender.  And thus, a good candidate for the fast, quick cook.

If you’re not properly coached, however, “cook” can turn your innocent chop into a disk of leather before you can say, “How long does it say to fry this again?” Luckily, heritage pork like ours has a bit of extra fat built into the muscles, so there is a buffer for error. I’m working very hard every day to get more fat inside your pork chop.

But if you follow these steps, you will have a perfect chop every time. Trust me. Do you trust me?

[h2]Step One: Plan ahead[/h2]

I know. It’s as hard for you as it is for me. Pork chops are supposed to serve as the solution to, “Oh, crap, I haven’t thought about dinner.” I'm supposed to be able to thaw and fry them up in the time it takes the children to form a hangry swarm around the kitchen table. I mean, you CAN do this, but feel ashamed about it. There are better ways. For best results, brine your chops.

tammyschops

The brine provides another layer of protection against overcooking, in addition to flavoring the inside of your meat. Brining alters the protein structures, and, well, science. Don’t argue with science.

We use a simple brine solution of 1 q water, ¼ c salt and ¼ c brown sugar. This usually is enough to cover four chops in a small casserole dish. I refrigerate the chops in the brine for at least 4 hours, usually more if I can remember to get things going in the morning.

Let my boring brine be the base for something more exciting. You can really go nuts with the brine, adding herbs, spices, anything you like. Bay, juniper, peppercorns, citrus, garlic, onion. Rosemary, pink peppercorns, sage, fresh coriander. Experiment. Live life a little. Tell me what you like best.

[h2]Step Two: Beat the heat[/h2]

Don't eat them yet! These chops are just slightly undercooked.

The USDA once recommended a cooking temp of 160 degrees for pork chops. Can you imagine?! This is why all the pork chops of my youth were ruined.

Well, that and the fact that the industry bred all the fat out of the pork sold at the grocery store. On purpose. I don’t understand it. Times were different, we’re all still paying the price.

The USDA revised the temp to 145, but around here, we've always taken our chops a little pink.

We live on the wild side. 

[h2]Step Four: The cook[/h2]

Chops, off to a good start.

This method assumes our standard ¾” chop from one of our shares. Adjust as necessary.

  1. Remove from brine and rinse/dry. Let chops come to room temp, about 30 minutes.

  2. Melt a few tablespoons of butter in a cast iron pan. That’s really what these chops deserve. It’s what you deserve.

  3. Heat the pan to medium high and slap those bad boys down. Turn the heat down to medium. Set the timer for 5 minutes.

  4. Don’t fiddle with them.

  5. At the beep, flip them and cook for 4 minutes more. That’s the maximum you are allowed to have them on the heat. Every second longer that you cook them, an angel sheds a tear for America. Angel dehydration due to overcooked pork chops is a serious thing. If you have a thicker chop, you have my permission to transfer the whole pan to a hot oven for a minute or 4, depending on the size of the chop. Translucent white or even a little pink in the center is OK. Adjust your times as necessary to achieve this. This is the way the pigs have requested it in their will.

  6. When the appropriate time has passed, take the chops out of the pan and put them on a plate to rest. Don’t forget to deglaze the pan with your most delicious liquid, (beer, homemade stock, blackberry vinegar) and pour this goodness over the chops at serving time. As an alternate, you can cook some brussel sprouts or greens or fry up your vegetable of choice in this liquid. 

This is pretty close to heaven.

[h2]Step Five: Eat the fat[/h2]

This is not your mother’s pork chop. (Sorry, mom! The deck was stacked against you!!) I can remember the grisly ring of hard fat wrapped around pork chops , pulling the whole thing up in the middle. It was gross. It was trimmed off. It was fed to the dog. But the fat from our chops is designed to be soft, delicious, caramelized from the sugars in the brines and perfect, like pork candy. You can eat this fat. You can even ask for seconds.

NEXT UP: WHAT THE HOCK?! Tips for preparing fresh hocks.

Lard, Have Mercy!

A tub of lard.

[dropcap_1]S[/dropcap_1]o, I don’t want to make you uncomfortable, but between our pigs and our cattle, we don’t buy seed oils anymore. I think if you dig through abandoned regions of our pantry you might find a dusty, half-empty bottle of olive oil, but we are strictly a lard/tallow/butter family now.

It’s our religion. We didn’t make the change for any hippy health reasons, but rather, I could no longer justify bringing more fats and oils into the house, given my line of work.

Lard from back fat.

I will say that now, every time I read about seed oils and hydrogenation and oxidation, I go massage the sunshine into the backs of my pigs and whisper that I’m sorry for all the bad things society made me believe about lard.

For those curious about the complicated process of lard, I’ll tell you: They take the fat from the back of our hogs, they cut it into small chunks or send it through the grinder, and then they warm it up until it melts so it can be strained into a tub. That’s it. No chemical solvent baths, centrifuges or bleaching. If that’s what you're into, ye must seek alternatives. But I’m a simple girl who likes a simple process. What can I say?

The same folks who told us that lard was unhealthy are now telling us that lard and other pasture-raised animal fats can actually help prevent cancer and heart disease. It’s all very confusing, but none of that matters now. What matters is that you have a giant tub of lard in your fridge or freezer, and it needs attention.

[h1]How can I store lard?[/h1]

That depends on how seriously you are going to take me. Lard doesn’t really “go bad,” per say, but it does start to absorb funky flavors from you fridge after a while. I’ve heard field reports that if neglected too long it can get more of a “porky” taste. So I say spoon out what you’ll use in one month and store it in the fridge. Freeze the rest. I’ve heard of folks storing lard at room temperature, but that scares me. It has to have a certain water content to be shelf stable and … just make some room in your modern cooling appliance. It’s the least you can do for your lard.

[h1]BUT HOW WILL I GET THROUGH THIS I’M SO SCARED[/h1]

Using lard in pie crusts.

To start, you need to make at least 12 pies per day. I’m teasing. I mean, pie crusts are pretty exciting, but there are EVEN MORE THINGS you can use lard for. I need you to think of lard the same way you think of canola, vegetable, coconut oils, or butters and --dry heave-- Criscos.

Are you greasing a muffin pan? Put down that spray bottle of butter-flavored WTF-Ever and scoop a chunk of lard from the tub with a plastic baggy over your hand like a boss. Are you making brownies for your kid’s classroom?

Throw that vegetable oil out the window, for heaven’s sake you have an entire tub of lard in the fridge! Obviously, if you’re frying anything in a pan, I don’t have to tell you what to do.

The high smoking point makes lard an easy choice, though I will accept butter as a substitute. Or tallow if you are making fries. Nothing else.

For the most part, we substitute lard cup for cup in all our recipes. (Since this change, my good and bad cholesterol, by the way, falls on the scale roughly alongside ‘athlete,’ so as the keeper of the guinea pig arteries, I will let you know if that changes over the years.;)

Our pig’s fat tends to be fairly soft at room temperature, but we warm if slightly if liquid form is a necessity.

[highlight_dark]Here are a few more ideas:[/highlight_dark]

[h1]Pork Confit:[/h1]

This is just wrong. Oh, so wrong. But so right. And it’s a two-day process, so get started yesterday.

  1. Dig that pork shoulder out of the freezer and cut into two-inch chunks.

  2. Rub everybody down with a nice coat of salt and spices and store it in a Ziplock bag in the fridge for 24-48 hours, turning once or twice. For a 3-4 pound roast, we like this mix: 1.5 TBS kosher salt, 2 bay leaves, 3 cloves crushed garlic, 2 TBS crushed black peppercorns, ½ TBS dried sage some rosemary, just wing it.

  3. Rinse the pork somewhat and arrange the chunks in a dutch oven or a ceramic bread pan for smaller batches. Melt enough lard to cover the whole thing -- usually about 3 cups or so. Cook in a 200-degree oven for 4-6 hours, or until fork-tender.

  4. Now the hard part. Instead of scarfing it down immediately, you should let it cool, cover it and refrigerate or “ripen” for at least 24 hours. It will keep in the fat for several weeks, though it has never lasted that long here.

  5. At serving time, warm the pan o’ lard until you can dig out the meat. Sear on all sides, plate and praise your chosen deity, because you are now ruined to everything forever.

BONUS: Be sure to save the “confit jelly” that seperates and forms at the bottom of the pan when the lard cools. Confit jelly is like a gelatinous homemade stock on steroids. Add this to soups or sauces or anything you want to taste awesome.

BONUS-BONUS: You can re-use the confit lard for the next batch, and over and over until it starts to make the meat too salty.We actually spread the seasoned confit lard on sweet corn in the summer, because we think we’re so funny when we call it “corn-fit”

[h1]Pie Crust:[/h1]

No need to reinvent the wheel, here. You can’t beat a pie crust made from equal parts butter and lard. Don’t use one or the other. They must be mixed for flaky, buttery perfection. We like:

2.5 C flour

1 tsp salt

1 TBS sugar

1/2 C cold butter in chunks

1/2 C cold lard in chunks

1/4 C cold water

Pam has a great breakdown of the process here.

BUT DON'T FORGET

Biscuits. Tortillas. You have Google, right?

[highlight_light]You do not have to eat it all.[/highlight_light]

Lard has many non-food uses as well. The best soap I’ve ever used was made from our lard. We also use it to season cast iron, and some folks use lard medicinally in balms and poultices.

Rendering Lard

[h1]ADVANCED:[/h1]

When you get really cool and start burning through your lard faster than I can grow it, you can request that your back fat trimmings and leaf lard be left separate, opening a whole new world of opportunity.

Don’t let the butcher have all the fun of rendering.

You can take your fats and render the leaf lard separately (leaf lard is the fat that cushions the internal organs, and renders more to a more pure end product than the rest of the fat.) Or you can cut the fat into small dice and use it to make sausages or whip it into life-changing lardo.

Or you can send the kids to grandma’s house and lock yourself in the tub and rub the fat all over your body. Wait. That’s a different blog.

Your turn! Tell me how you empty your tub.

Next up:

PORK CHOPS!

Rooter to Tooter To Teter - Going Whole Hog

Pastured_PIg

[dropcap_1]U[/dropcap_1]ntil we started raising our own livestock, I was the girl buying bags of boneless chicken breasts and two-pound slabs of bacon. Throw in a tube of anonymous ground beef every now and then and that was about the extent of my animal protein prowess.

What can I say? I was in my early 20s and on a wild and dangerous path.

It was only when we started birthing, growing and slaughtering animals on the farm that I began to know, love and respect all the whole beast has to offer. I suspect this will be a lifelong process. And a delicious one.

BUT!!! If you’re anything like I was the first time we received a box from the butcher, you’re likely looking at some of this stuff with fear and mistrust. If you’re not, well good on you. You are a far more seasoned and capable human being than I was.

As our Good Meat Family grows faster than we can put names with faces, I probably shouldn’t assume everybody eats like a farmer. Best not to abandon you with cold meat and zero instructions. How cruel. In the next couple weeks we'll go through the typical cuts of one of our quarter shares and hit a few of the highlights for our favorite practices and procedures here in the farm kitchen.

Many ideas originate from my more culinarily advanced customers, so PLEASE, if you have submissions, share with us. Hearing about how you try something new, about how you prepare Six Buckets pork, about how our pigs become part of a family dinner or a night with friends … this is what sustains your farmer. Unlike most humans, my energy is derived 90 percent from tags of meat photos on Facebook. Anyone can pick up a pork chop at the grocery store, overcook it on a pan before rushing off to whatever, but there’s more to life than that, isn't’ there? At least every once in a while. What a glorious time to be alive! What a glorious, glorious time!

Wait. What were we talking about? Right. Pork parts.

Let’s start with the most foreign object, shall we? Winner of “What the hell have you brought into my home?” on days the Hambulance invades your neighborhood. That’s right. That Big Ol’ TUB O LARD.